thisismyrobot

Littered with robots and Python code

Shopping

I just bought the sonar range-finder for my Heli-bot from Maxbotix .

I purchased the most sensitive of their sensors, the EZ0 , for the front of my heli-bot, to test out the "autopilot" PICAXE control. This looks to be an awesome sensor, with a 1-inch resolution out to 6.5 meters! It offers either continuous or polled mode, and the sensor output is RS232, 0-Vcc or Pulse-width, all in a package smaller than a cubic inch. Full datasheet is available here. (pdf)

By the time the exchange rate and postage was taken into account, it came to about $90 AUD.

I will be giving this sensor a thorough workout when it is attached to the robot, probably less than 20mm from the front rotor's drive motor, so we can see how it behaves in an electrically and acoustically noisy environment.

Swarming bots

This is a very interesting video that I just found on YouTube.


(if it doesn't seem to play properly, move the slider forward a bit)

The title says it all, "Swarm-bots pulling a child."

I tracked the video down to this site, if you want more information on these bots.

A different project

Whilst I sort out some annoying rs232 problems with my Arduino, I have been working on a couple of little projects, one of which I can show a bit of today.

This starts with a little history. I have always been interested in flying contraptions, and a while ago, on an impulse, I purchased a LAMA V4 RC Helicopter (below).


The LAMA is a basic, easy to fly, Coaxial helicopter. Obviously, as soon as I had learnt to fly it, I started modifying it. Since then, it has been converted into a small, light-weight platform for some future robotics experiment.

...A year passes...

Now, to the present, and I will show you a video. This is the LAMA in it's current state, being flown relatively badly.


The important thing about this video is the details, specifically that I have inserted a PICAXE-08M chip in between the output of the RC receiver and the back-and-forward tilt servo on the helicopter. The point of this is to test the accuracy of the PICAXE's pulsin and pulsout 
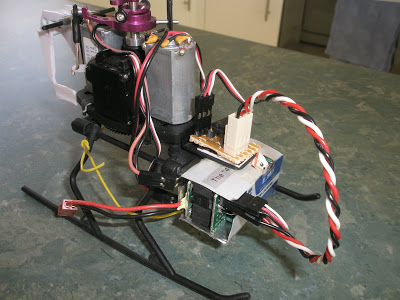
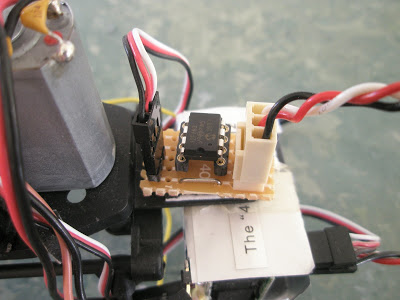
commands. The program on the PICAXE simply listens for a pulse from the RC receiver's servo connector then repeats that pulse, sending it to the servo. The PICAXE is installed as shown in the following two images (click to enlarge).


The point of all this is to verify that the PICAXE is capable of accurately and quickly repeating Servo control signals. This has been verified, as the helicopter flew as well as it did before the modification, with there being absolutely no difference in the fidelity or response of the servos. Based on this, I intend to connect an accelerometer ( possibly this one at Maker Shed ) to this PICAXE, allowing the helicopter to maintain a steady forward/back position in space. This will be expanded to left/right as well after the accelerometer's integration is finished.

The most awesome part of this experiment is the simplicity. Anyone, with a $5 IC, can interface and interfere with the signals to an RC servo, and do so in a high-accuracy manner. Adding to this simplicity is the fact that (in this case, at least) the PICAXE is powered from the power supply to the servos, which was 5V.

The PICAXE-08M code for this example is as follows:

main:
'read a pulse in
pulsin 4,1,w0

'pulse it out
pulsout 0,w0

'loop
goto main

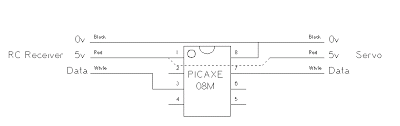
The circuit is simple too (click to enlarge):


I just have to name whatever it will become now. How about PICopter.

Another robot!

G'day all, its been a while! I have been attempting to furiously study for my upcoming exams, but unfortunately I have lapsed and produced the following...

Introducing (drum-roll) Procrasti-bot!

This little fella drives around madly, taking photos with a cheapo keychain-camera whenever it smacks into something. It is the product of a pile o f spare parts I have had lying around for a while. I intend for it to be controlled by a BEAM-esc circuit, an d run off a 1.5v rechargable AA battery.

the bot, pre bumper addition

close-up of the bumper-switch

the bumper

a pre-bumper rear view

underneath, showing basic pre-bumper test wiring

If only I was more creative, this could become some sort of art project...

An awesome kit!

This is an awesome kit that I just found via Boing Boing . Ok, sure, USD$550 isn't cheap, but you get WiFi and stereo vision in one very neatly laid out board.

Videos, videos, videos

Here is a pair of new videos, the first containing the obligatory crash... I have modified the earlier code to include some basic logic for turning either left or right when confronted with an obstacle.


Now, back to study...

Arduino 12 released!

Grab it here, thanks Make. I'll recompile my latest build in it later today and let you all know of any changes that relevant to the robot.

Circles and lines

Here it is in action, with the pair of shiny new L293D's from Solarbotics. They didn't fit first go, but after a bit of gentle modification of the Rogue Blue's servo casings, it all came together.


The finished result is definitely more sprightly than before!

For those of you with both an Arduino and the desperate need to hook it up to a dual H-Bridge, the code is here.

More shopping


Whilst I wait on the Secret Motor Drivers, I decided to snap up another little bargain, one of SparkFun's 20x4 LCD screens (pictured).

This LCD should be perfect for displaying information from the camera, allowing testing and debugging without using the serial interface (a problem if that interface is shared with your serial CMUcam as all data sent "to" the arduino serial monitor is also sent "to" the camera, which then returns a cacophony of errors.

Also, this will allow real-time data display whilst the robot is moving, without having it tethered via USB.

Finally, I made it onto Make Blog via my submission to Let's Make Robots !

Motor drivers and tribulations

I have given up on the recycled-from-a-cybot h-bridge, and have purchased a pair of these little beauties, the L293D Secret Motor Driver.


Each one fits within the Servo's casing, giving me hidden bi-directional control and switching up to 5khz.